Thursday, July 28, 2016

Hair Journey - Growing out my Grey


I'm posting this as a reminder to me and an inspiration to others you might be going through the same thing.

In 2009 I lost all my hair from chemo treatments for breast cancer.


When it started growing back in 2010 I was surprised at how grey it was.


March 2010


I let it grow in for a bit but it was short and curly and I wasn't ready for that look.


 May 2010


December 2010


I dyed it my "natural" dark brunette colour in the fall of 2010 and continued to do so until late 2014.


Me and my sister Yvonne summer of 2014


After a while, I got tired of that "skunk" line that would appear only 2 weeks after I'd done my roots.  It was getting costly and I started dying it myself in between salon visits.

During Christmas 2014 I decided that January 2015 would be the start of my Grey Grow Out!

So I've been growing out my grey hair since January 2015.

I started off by seeing a great hairdresser who was well known for dying young girls hair that popular lilac-ly grey.

He bleached out my dark brunette "box" colour and gave me some low/highlights to transition as my hair grew out.

And after a few months, it looked like this.


I have to admit that it's taking a really long time to grow out all the colour - I'm surprised at how much "caramel" colour I had on the ends.

This was taken earlier this month (July 2016)


I finally decided to see another hairdresser and try to "frost" out the ends and add some highlights.

This is what it looks like today - a bit lighter than I expected but I'm happy with the brighter look for the summer!

Not sure I'll keep it this way but we'll see how it grows out...

Tuesday, March 29, 2016

I feel like I need a project....

I'm at loose ends right now...

It won't last long because I've got a lot of busy work around here - nothing major just small projects and chores to get done now that the weather is nicer.

I feel so scattered, but I'm sure that's because I've been focused on getting the master bathroom done.

Here's what I've been up to lately...


  • We've had some sunny days so I've been working in the yard weeding and building a moat (fixing some drainage issues).
  • I need to work on my garage!!!  I won't even share a pic of that with you - it's sooooo bad!  Lots of reno leftovers and stuff that's been dumped in there over the winter.  I have to empty it out completely and only put back stuff that I "need" to keep.
  • And I need to clear out my closets and storage in the house...My daughter came home on Sunday and filled 4 bags of unwanted clothing from her bedroom closet - she's filled 2 bags from her apartment closet too.  I've already dispersed the good stuff and dropped off the leftovers at the Sally Ann.  There is a bag of "fancy" prom shoes left and I'm trying to find an organization to donate them to for "cinderella" type projects.  If you know of any please leave a comment.
  • The bathroom reno is done and the kitchen planning/reno is too far off to put any time into it now.  But I am saving inspiration pics and asking for advice on some of the ideas I want to implement there.  Banquette or no banquette?
  • The crochet has been put away until the fall - not sure what I'm going to do with it all though.  I feel like it's time to move on to something else but I'm not sure the leather tassels will do it for me.
  • I had someone contact me through my other blog about COPIC colouring and that's got me thinking about clearing out my craft room so I can play with my colouring again.
  • I need to get some dog things pulled out of storage and sorted out because I've got a new puppy coming at the end of April and then I'll be real busy with him.
I just need to make a list and get to it before our new little one arrives!

What's on your spring cleaning/chore list?


Until next time...
Marie


Sunday, March 20, 2016

BKF continued...

After I wrote the post the other day on Bar Keepers Friend I cleaned my glass cook top to see if I could get the scorch marks off.

Here's the Before (top) and After (bottom)

I left the Bar Keepers Friend (cream) on the marks for a few minutes.  Then I used a plastic scrungey to work out the marks. 

I've used other products and even a ceramic cooktop cleaner but after several attempts I just gave up.  These marks would not come off and I thought they were going to be permanent. But BKF got these marks out!

I also did 1/2 of a stainless pan.

Here's the Before (left) and the After (right)

This pan had been used to saute something (?) and it was washed a few times but the white marks did not come off.
You can see by the pic on the right that the pan was clean and shiny on the side I washed with Bar Keepers Friend!

Until next time...
Marie


Wednesday, March 16, 2016

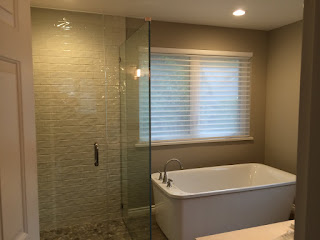
Finally the Master Bath is Finished!!!

Here are the final pics from our "Master Bathroom Renovation of 2016"


Until next time...
Marie

Let me introduce you to....

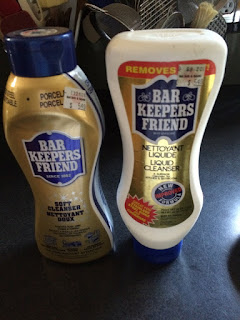
Bar Keepers Friend!


I know there are other more popular creamy cleansers on the market (Vim, Ajax, Comet etc) but I personally found them to be gritty and leave a residue.

One day I came across Bar Keepers Friend at Bed Bath & Beyond and decided to try it out on my stainless sink and cookware.

I was so pleased with how shiny and clean my stainless steel sink and pots/pans got that I decided to try it on other things.

I use it on my glass cooktop too and it works really well at getting that burned on residue off.

But it's perfect for cleaning those "scratch" marks on your white ceramic dishes that comes from your utensils.

My white/off white ceramic cereal bowls and mugs often look like this after a while


It almost looks like they're cracked but really it's just scuff marks from my spoons (almost looks like pencil marks too).

After a quick scrubbing with Bar Keepers Friend, and then a thorough rinsing and washing with dish soap they look good as new!

Here are the before and after pics


Here is my disclaimer - This product contains Oxalic Acid (naturally derived and found in leafy green things) but like a lot of cleaning products it is very bad for your skin so wear gloves and read the warnings before using.  
Also, before going to town and using it on your own dishes & cookware I would test it out on the back to see how it affects your finishes.  I use this on my Pottery Barn & Mikasa off white dishes (ceramic/stone ware) and glazed white ceramic mugs.  I have not had any of the finish come off and you can see in the bowl after pic above how shiny the finish is after I use it.
After you've used this product to clean anything make sure you wash it thoroughly with warm soapy water and remove all residue of BKF from the surface.

Until next time...
Marie


Sunday, March 13, 2016

Cedar Hedge Trimming

As our neighbour put it - we "went HARD on the hedge" this year!

We have this huge cedar hedge around our property.

In some places it's 20 feet high (at least) and in front of the house it's probably over 10 feet high and 10 feet wide!

We try to trim it back every year but sometimes it goes a bit longer between trims.

That and the fact that it is in the path of the street rain water run off on one side and in direct contact with our neighbour's sprinkler system on the other has contributed to this hedge getting WAY too big!

Here's some BEFORE pics of the hedge "absorbing" our driveway lamp posts  (taken 2014 & 2015):


The lamp posts have been hit a few times and we have plans to redo them (in 2017?) to look like this (see this post for more stone work ideas):


We have talked about taking out the first cedar tree behind the posts and replanting with new cedars in a V pattern so that we can keep them trim and behind the posts.

I told the hedge guy our "future" plan and asked him to cut the hedge back a bit more behind the lamp posts so we can get into our driveway more easily.

I think he got a bit carried away...

AFTER pics:

From same view as above

My hubby was not too happy with this year's "trim"


From the street view (I think it looks pretty good or maybe I'm just getting used to it?)


We planted some pampas grass temporarily to fill the space until we're ready to do our front of the house reno.

Until next time...
Marie

Sunday, February 28, 2016

Kitchen Reno Ideas

Still a long way off but I'm collecting ideas for the Kitchen renovation (next year?).

I'd like to put in a built in bench nook seating area like these...


And I've started collecting storage ideas like these...


Until next time...
Marie

Friday, February 26, 2016

DIY Canvas Headboard

I saw this Benjamin Moore painted canvas headboard DIY project on Cityline the other day.


I love it!

I think it would look so cool done in the natural linen canvas - no painting necessary.


Or you could buy cheap canvas boards and cover them with fabric - using the boards are bases.

I think there are 12 square shaped canvases in 2 different thicknesses in this project...

Unfortunately, I already have a headboard and so does the bed in my daughter's/guest room.

Remember this one we found in an alley and spray painted red...


My son doesn't have a headboard - but he's got posters all up his wall and doesn't want one.

So I'm filing this away (documenting it here) for when he moves out and we change his room into a guest room.

Until next time...
Marie

Knock! Knock!

Our master bathroom was full of brass - taps, shower enclosure & towel bars.

Now that we've gotten rid of it, the only brass left in our house is our door knobs.

I know that gold hardware is making a comeback but it's not my taste.

It's so dated looking!

We have 11 30-year-old brass door knobs left but I'm slowly converting them to brushed nickel.


I did find all the same knobs for replacing the brass ones -  it just takes me time to go through and do every door.

After this is done the next job will be to repaint all the doors and trim in the house (maybe this summer?).

The only problem I've encountered so far with switching out brass for nickel is my pocket door hardware.


I could not find a brushed nickel or stainless pull to fit the rectangular opening made for the original brass one.

So I spray painted the brass one with Rustoleum Universal in Satin Nickel.


There are all kinds of blog posts and articles about spray painting the actual door knobs and I did consider this.  But mine do get a lot of traffic and I didn't know if the spray paint would hold up.

However, now that I have a new can of spray paint I'm looking around the house to see what else I can revive with a Satin Nickel finish!!

Until next time...
Marie

Closet Door Conversion Complete

I finished converting the hall closet to french doors and also did my linen closet.


It was so easy - I did it all by myself!!

The hardest part is positioning the new stationary pivot bracket at the top of the door. But that just took a few adjustments so that the door wouldn't scrape the wall and fit snug against the other door. Then it was all good!

I also had to mount the top magnetic catch on something so it would clear the track.  I used a scrap piece of trim board.

If your doors stay closed without this, then you might skip it, but for $4 extra it keeps my doors nicely closed.

Until next time...
Marie