Tuesday, December 20, 2011

Put a flower on it!

My daughter has been teasing me lately about putting a flower on everything I wear from sweaters, coats, scarves and hats.

I can't help it - I love making these flowers and wearing them.

Now I'm crocheting hats and cowl scarves!

Here's a couple of photos of my daugher and I wearing some hats I made with flowers.


Until Next Time!
Marie

Wednesday, December 14, 2011

Crocheted Flower Pins

I have been so inspired by all the woolly  handmade stuff I've seen on Pinterest that I had to join in!

Check out these beautiful (if I say so myself) handmade crocheted flower pins that I've been making.

They are so pretty in real life and I've made them in tons of colours and fibres.

I've sold a few at a local craft sale and given a bunch away to friends for gifts. 

If you'd like to purchase one they will be available at Scrap Arts this weekend or you can email me and I can ship one (or two) out to you.  To see more photos click on the page above.
Until Next Time!
Marie

Saturday, December 10, 2011

Ornament Wreath Re-Do

Although I liked the idea of the simplicity of using a wire coat hanger to make a wreath I was not happy with my final results.

Why?

It was too small for my door, it was too thick, I didn't like the coat hanger showing, it was losing it's shape from the weight of all the ornaments, and it was scratching my door.

This is what it looked like


So last night I fired up the glue gun and re-did the wreath.

I used the same ornaments just mounted them on a different base!


I used a 24" artificial wreath ($5 - found one 50% off)  and wrapped it with gold tulle ($3 on sale too).  I wrapped the tulle around it to hold down the greenery and protect my door from getting scratched. 


Note: You might be able to find a better solution for a base but all of the foam cores I saw were too small or too big and this seemed like the easiest choice for me at the timeIf I had seen a grapevine wreath that might have worked too.

When I glued down all the ornaments I noticed that there were gaps where the cap of the ornament showed or between ornaments.  So I bought some small filler balls in red and gold to glue into the "cracks".


It has a thinner profile than the wire coat hanger wreath.  Compare the two below.

WIRE COAT HANGER BASE WREATH PROFILE
 ARTIFICIAL WREATH BASE PROFILE


The revised wreath is so pretty I don't think it even needs a bow.


What do you think? 

Until Next Time!
Marie

Wednesday, December 7, 2011

Ornament Wreath

How do you like this ornament wreath that I made?


 You just feed ornaments on to a wire coat hanger.  Then you use the hook in the hanger to hang it up.
I don't really like that the hanger hook is showing....

 And it kind of sticks out quite a bit on the door. 
This wouldn't work if you had a screen door on top of your front door!

I got my ornaments from Bed Bath and Beyond - a package of 41 for $13.99. 

I bought 2 packages to make this wreath (yep 82 balls!). 

You can find unbreakable ornaments everywhere for different price points - I saw some great ones by Martha Stewart at Home Depot - but the reason I choose these ornaments was because of the colour combo (red, green and gold) and there were both shiny and glittery balls in 2 different sizes.

I made this ornament wreath using THIS TUTORIAL.

If you are a visual learner click HERE and HERE for videos.

There are lots of different versions of this oline and I might take mine apart and do it on a wreath form.

I found THIS ONE - without using the hanger on a foam core wreath.

THIS ONE using a green wreath base.

Until Next Time!
Marie

Tuesday, November 22, 2011

How to tie a scarf?

It's scarf season!

I often get asked how I tie my scarf and I don't know...I just do it!

But I wear it the same way all the time so it got me thinking of other ways to wear a scarf.

I came across this video and thought I'd share here for those of you that are visual learners.

Until Next Time!
Marie

Sunday, October 30, 2011

Roadside Mushrooms


I saw these by the roadside the other day when I was driving my boy to school. 

Of course I had to stop and take a photo with my camera phone!

Does anyone know what kind of mushroom they are?

Until Next Time!
Marie

Saturday, October 29, 2011

New Posts!

I've got new posts and I don't mean blog posts!

Ryan from SI Custom Creations came out today and revamped my staircase by adding these awesome 5x5 Shaker style posts.


 Here are the BEFORE photos - what a difference!!


Until Next Time!
Marie

Tuesday, October 25, 2011

Houzz

Have you been to the Houzz website?

I get a lot of ideas and even have boards on Pinterest but I like to look for house ideas on Houzz.

Recently I got the idea to redo my stairs from Houzz.

Here's the before photo:


We've lived in this house for 14 years and I have always hated the end of my staircase.

For my birthday my husband gave me the "go ahead" to have the end posts redone.

I'm going to have the end posts replaced with these:


I'll post the actual AFTER photos after it's done this weekend!

Until Next Time!
Marie

Angie's Crockpot Potato Bacon Soup

I saw THIS RECIPE for Crockpot Potato Bacon soup posted by Angie Juda and I knew I just had to try it.

I did and my family loved it!!


The only changes I made were:
1.  I omitted the green onions
2.  I added more chicken stock - instead of 3 cans I added 1 tetra brick that was almost 1 litre
3.  I used a 1 kg package of McCains Hash Browns. 

It still turned out very very thick and creamy!

Until Next Time!
Marie

Wednesday, October 19, 2011

Before and After - House Chores

I have been neglecting my craft room.....

I've been busy with the kids and stuff around the house.

These are just 2 things that I have been working on that have kept me from my crafting....

I repainted my daughter's room from this bright yellow to a more calming blue.  Yes I had to prime it first!

BEFORE


to this:

AFTER


I also did a bit of "tile" work.

We redid the kids' bathroom a couple of years ago and when I picked the grout I chose the colour based on the sample tiles.  Well in the end the sample tiles were much lighter than the actual tiles installed and I never did like the way the grout line looked.

So I added colourant and resealed the grout.

This is what it looked like BEFORE:


 and this is what it looks like now AFTER:


I think it looks much better!

Until Next Time!
Marie

Wednesday, October 12, 2011

Halloween Decor Ideas

I don't do too much for Halloween now that the kids are older. 

Sure I'll put up my house witch, the fake graveyard in the front yard, some decorated pumpkins and a wreath  - but that's about the extent of it.  Believe it or not I used to do soooo much more!

I still love to see all the decor ideas out there and every year there is something new and different.

Last year I quit carving pumpkins and instead I decorated these pumpkins with vinyl clings from  Stampin' Up! Decor Elements.


I just love WHITE pumpkins.  Check out these that have been blinged out with black rhinestones!
Bejeweled White Halloween Pumpkins holiday decorations
holiday decorations design by Horchow

Pinned Image

But be careful you can overbling them! These pumpkins make me think of Liberace!

pumpkins with rhinestones


These white pumpkin candles are really cool too - but I probably wouldn't light them!

White Pumpkin Candle candles and candle holders
Now from Elegant to Wacky! Love these!!

Pinned Image

I have a skeleton that I used to hang in a noose from a tree in the yard but I never thought to put it on the house like this!!  I'm going to have to try that this year...

Pinned Image

I love these cake ideas too but the hand one is a bit disturbing!

Pinned Image

Pinned Image
Here's a simple and fun idea for a halloween party - candy cones!  I don't know about you but I have tons of Halloween digital paper and it would be so easy to make these!


New Skeleton Papercone accessories and decor
accessories and decor design by West Elm

These mummy candy jars are so cool and look easy to  make!

Mummies Love Candy
I could go on and on but there are just too many ideas to share here so check out Pinterest and Houzz or Google for yourself!
Until Next Time!
Marie

Friday, July 1, 2011

Bloom!

Last week I shared some photos of my backyard and gardens.  Click HERE if you missed it.

We've had a long wet and cool spring here and it seemed like we were a few weeks behind with the flowers in our yard.

Well just one week later and everything is pretty much in bloom!

Check out my roses!


 We cut back these bushes every year to about 1 foot high and by the end of the summer they are up to the roof line!  These roses are as old as our house - 24 years old!
 It's hard to tell in this photo but they are a beautiful coral pink colour.
 This hydrangea is about to explode!


 The flowering trees are all bent over because they have tons of buds and flowers on them!
 Today I got a new wreath to try out on the front door - not sure if I like this particular one - but I needed to take the Christmas wreath down and get something more springy/summery.

Until Next Time!
Marie

Tuesday, June 21, 2011

No stamping or colouring today!

Today was such a nice day that I felt the need to go outside and work in my garden!

Here's a few photos from my backyard.

These are flowers from my planter boxes.


This is some lavender - at least I think it is. 
I don't do the planting (my husband does) but I'm in charge of the weeding and pruning.
Leeann left a comment asking what this next photo was. 
It's my outdoor fireplace. 
See how the hearth is raised and goes around the entire patio (it's sunken) well it's perfect for entertaining and s'mores parties!
 This maple reminds me of Cousin It from the Adams Family!
This hosta ends up being huge by the end of the summer!
These are the double sliding doors in my dining room. 
I've got fuschia growing in that planter.
 Check out my side gate - it's completely covered in hops and clematis!

 These next two are from flowering trees in my yard.


Blooming chives!

 
 My husband was "helping" me in the garden.
 Beyond our back fence is a creek and wooded ravine.
Looking at the creek from the opposite side.

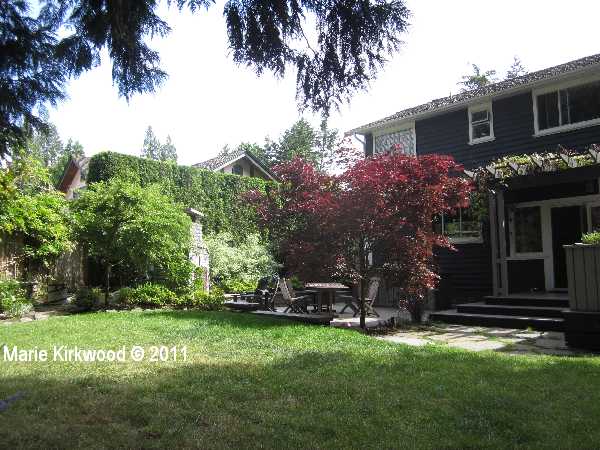
 I call these next 2 photos of my backyard the Real Estate Weekly shots.

To the very right - behind the garage - is my son's basketball/sport court.
 Here's Murphy guarding the yard.


Until Next Time!
Marie